
Interested in making your own soy and/or non-soy tempeh at home? Join my free WhatsApp group Homemade Tempeh (Recipes, Tips, & More)!
For a long time, I thought tempeh was this “fermented soy bean thingy that was high in protein.” I used to buy store-bought tempeh and never thought about how it was actually made. One day, while looking for recipes to cook with tempeh, I came across a video for growing your own tempeh at home. One click led to another, and soon I learned that you can make tempeh not just from soybeans but also from a variety of other non-soy legumes!
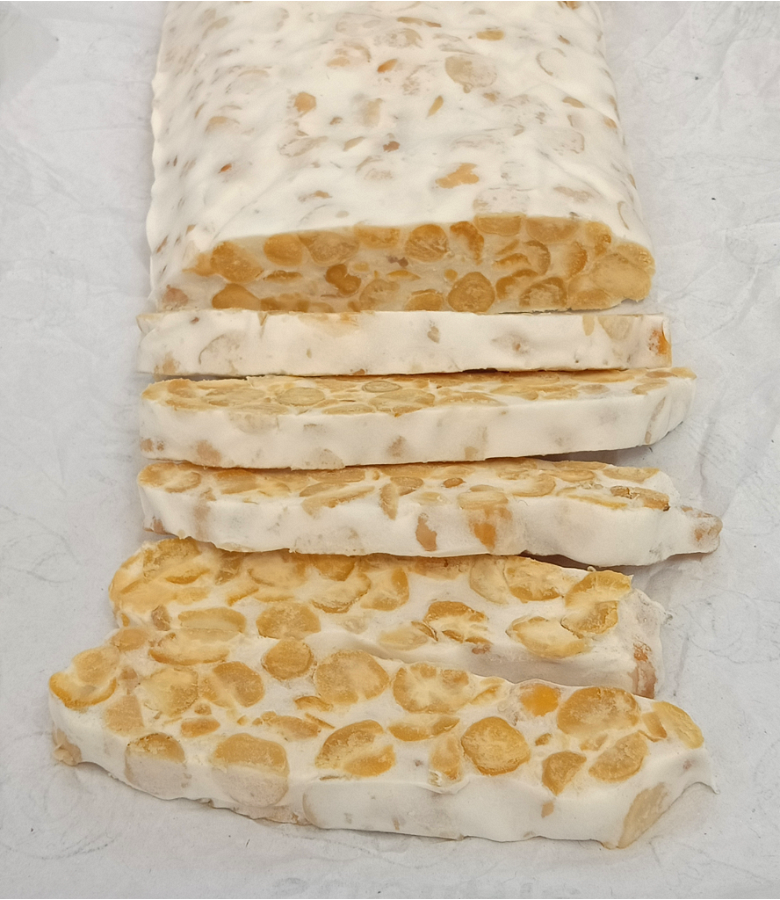
Read more: Homemade White Chickpea Tempeh (Soy-free Tempeh)In this post, I will tell you how to make homemade tempeh (“tempu”) with white chickpeas. Since white chickpeas have higher carbohydrate and sugar content than soybeans, chickpea tempeh tends to incubate faster. It is usually ready for harvest after 24 to 26 hours of incubation. Chickpea tempeh has a milder flavor and a “desi” vibe. You can use it the same way you use soy tempeh. Follow this link to make Homemade Soy Tempeh.
If the idea of making tempeh at home intimidates you, don’t be! It is really very easy to grow your own tempeh in a standard Indian kitchen. I don’t even have a kitchen scale! Check out this post, Homemade Tempeh: Tips for Beginners, for the basic tips before you begin.
Homemade White Chickpea Tempeh (Soy-free Tempeh)
Time taken: 20 minutes cooking time + 2 hours cooling time + incubating time (24-26 hours)
Yields: approx. 4-5 hearty servings
1 Indian teacup = 150 ml
Ingredients
- 2 cups dried white chickpeas
- 2 teaspoons vinegar (any kind; I use ACV)
- 2 teaspoons rice flour/besan
- 1/2 the contents of 1 sachet Alla Posh tempeh starter*
Cooking the White Chickpeas
1. Soak the white chickpeas overnight (8 to 12 hours) in warm water. Drain and rinse.
2. Pressure cook the white chickpeas with adequate fresh water for 13-14 whistles on medium-high heat. The chickpeas should be cooked al dente, i.e., fully cooked and firm to the bite. It shouldn’t be either under-cooked or mushy.
3. Once the white chickpeas have cooled down, chop them up roughly. Some of the skins will loosen up during this process; remove them. It is perfectly fine to leave some of the chickpeas intact. This process is important to ensure easy packaging of the inoculated chickpeas and uniform fermentation of the tempeh block. Keeping all the chickpeas whole will make it difficult for the spores in the starter to work effectively.
The Drying Process
1. Take the white chickpeas in a big bowl and sprinkle the vinegar on them. Toss well so that each piece is uniformly coated.
2. Heat a heavy-bottomed or non-stick kadhai, and pour in the wet white chickpeas. Maintain the heat on a low-to-medium level and stir the chickpeas occasionally, letting the extra surface moisture evaporate. Switch off the heat after 4-5 minutes once most of the surface moisture has evaporated.
3. Take 2-3 large plates/trays, and spread out the chickpeas evenly in thin layers and keep to cool down and air dry. You may place the plates/trays under a fan. Let the chickpeas dry completely; they should be 100% dry to the touch with no surface moisture. This may take around 30-40 minutes in the humid summer months in India.
4. Once the white chickpeas are completely dry, transfer them to a clean, big bowl.
How to Inoculate
1. In a small dry bowl, take half the contents of a sachet of Alla Posh tempeh starter culture (around 1.5 to 2 gm) and add the besan/rice flour to it. Mix well.
2. Sprinkle this powder all over the cooked, cooled, chopped, and dried white chickpeas. Toss and mix well for several seconds until each piece is uniformly coated with the starter-besan/rice flour combo.
3. Take a small ziplock bag and prick holes at 1-inch intervals using a toothpick. Now spoon all the white chickpeas into it. Press out all the air from the bag and seal it. You may have to fold the bag to reduce its size.
4. Place the bag on a flat surface. Use your hands to gently press down the chickpeas to form a uniform block of around 1-inch thickness.
The Incubation
1. Place the ziplock bag on a wire-rack tray and keep it to incubate undisturbed in a warm but well-ventilated area. For the best results, place a tray of water underneath.
2. If you don’t have a wire-rack tray, simply spread a clean kitchen towel on the counter and place the ziplock bag on it.
3. The inoculated chickpeas will start to generate its own heat after about 10 to 12 hours.
4. Between 12 to 15 hours of incubation, you will be able to see some light condensation and the beginning of some white mycelium growth.
5. The mycelium will continue to grow and thicken rapidly over the next few hours, binding the chickpeas in a firm white layer called the “tempeh mushroom.” Flip the packet over at 18 to 20 hours to ensure even air circulation.
6. Your white chickpea tempeh is ready for harvesting when the entire surface is covered with thick, white “tempeh mushroom” and feels firm to the touch. It should be a solid cake and smell like lightly fermented idli batter at the time of harvesting. This can take around 24 to 26 hours in Indian summers and longer in winters.
Harvesting and Storage
1. Remove the tempeh block from the ziplock bag once it is ready. Steam the tempeh for 10 to 12 minutes to soften it and to remove any bitterness from the fermentation.
2. Once cooled, you can store the tempeh in an airtight container in the fridge for up to 4-5 days. You may also pack the tempeh in a ziplock bag and freeze it for up to two months.
Notes:
*I used Alla Posh soy tempeh starter culture to make this batch. Yes, soy tempeh starter culture can be used for non-soy tempeh as well. A single sachet contains 3 to 4 gms of starter culture powder. For the quantity of chickpeas mentioned in this post, we need 1/2 of this amount, i.e., 1.5 to 2 gms.
*Tempeh starter cultures from different brands may differ in quality, so I recommend Alla Posh as it is tried and tested by me and the members of my Homemade Tempeh WhatsApp group.
*You can easily halve or double this recipe. For beginners, I would recommend halving the recipe for the first few attempts.
Also see:
Homemade Tempeh: Tips for Beginners
How to Make Homemade Tempeh Starter?
How to Know if My Homemade Tempeh is Ready?
11 Varieties of Soy & Non-Soy Tempeh to Make at Home
11 Exciting Ideas to Use Tempeh in Indian Cuisine
It looks so beautiful ❤️
Thank you 🙂
[…] with just about any legume and not just soy beans. I have already shared my recipe for making White Chickpea (Kabuli Chana) Tempeh at home, and in this post, we will talk about making Kala Chana or Black Chickpea Tempeh. Kala […]
[…] Homemade White Chickpea Tempeh (Kabuli Chana Tempeh) […]